The system defaults to the General Information window whenever you select the Transaction option. To access the General Information tab from another window in the Transaction option, click on the General Information tab, or press “Alt N”.
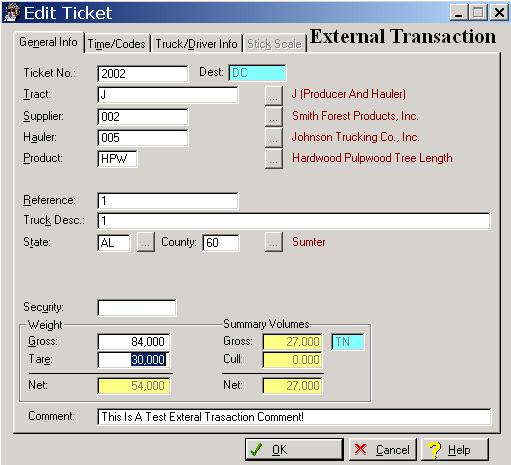
The system will display the External Transaction General Information window as follows:
Enter or edit the information on the External Transaction General Information window according to the following specifications:
Ticket Number
Enter the ticket number for the external transaction. The ticket number is a fifteen-digit numeric field.
Tract
Enter the tract from were the load originated. To display a selection list of valid tracts, press Enter, or click on the Lookup button. Inactive or completed tracts are not shown on the selection window. An entry in this field is required. The tract selection list is presented as follows:
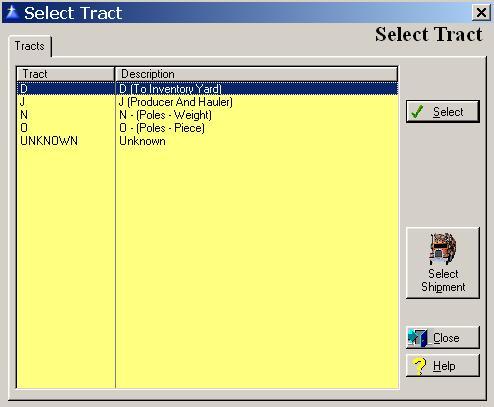
To select a Tract, highlight the tract and click the Select button, or press “Alt S”.
If the load represents a shipment, click on the Select Shipment button, or type “Alt P”. There are two types of shipments, inventory and non-inventory. When the select shipment button is selected, the system displays the following window:
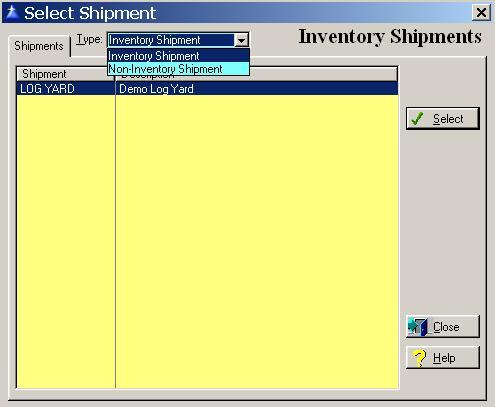
To select an Shipment, highlight the shipment and click the Select button, or press “Alt S”.
The system defaults to displaying “inventory shipment” sources, to display the “non-inventory shipments” sources, click the drop box arrow.
Supplier
Enter the producer or supplier delivering the wood. To display a scroll list of the valid producers or suppliers on the tract, press the Enter key, or click on the Lookup button. An entry in this field is required.
Hauler
You are only prompted to enter a hauler if the job code assigned to the primary producer or supplier indicates that a hauler is to be paid separately. To display a scroll list of the valid producers or suppliers on the tract, press the Enter key, or click on the Lookup button.
If the hauler represents an Intra-Company Trucking department, you are prompted to enter the truck number, driver number, and driver rate table code. The Truck and Driver Information window is shown as follows:

Enter the information on the Truck and Driver window according to the following specifications:
Truck Number
Enter the truck hauling the load. To display a selection list of valid trucks, press Enter, or click on the Lookup button.
Driver Number
The driver number field defaults to the driver assigned to the truck. Accept the defaulted driver or override the defaulted driver with the correct driver. To display a selection list of valid drivers, press Enter, or click on the Lookup button.
Rate Table
The driver’s rate table field defaults to the rate table assigned to the driver. Accept the defaulted rate table or override the defaulted rate table with the correct rate table. To display a selection list of valid rate tables, press Enter, or click on the Lookup button.
To save and exit the Truck & Driver window, press Page Down, click on the OK button, or press “Alt O”. To exit without saving the Truck & Driver window, click on the Cancel button, press “Alt C”, press Esc, or click on the “X” in the upper right corner of the screen.
Product
If only one product is assigned to the tract, the system defaults to that product. If multiple products are assigned to the tract, you must select the product from the displayed selection list. To display a selection list of valid products, press Enter, or click on the Lookup button.
Cull Code
If applicable, enter the cull code for the product. Cull codes are defined in the destination. If there are no culls defined for the destination, the cursor skips the cull code field. To display a selection list of valid cull codes, press any invalid character and Enter, or click on the Lookup button located at the right of the “unit” field.
Cull Volume
If you have entered a cull code, an entry in the cull volume field is required. If you did not enter a cull code, the cursor skips the cull volume field. The cull volume must be entered in the volume of the unit of measure displayed at the right of the volume field.
Reference
The reference field allows for the entry of up to fifteen characters.
Truck Description
The Truck field allows for the entry of up to thirty characters. If the hauler is a company owned trucking company, the description of the truck defaults from the earlier selected truck.
State
Enter the State where the product was severed. Press the Enter key, or click the Lookup button to display a selection list of the valid states.
County
Enter the County where the product was severed. Press the Enter key, or click the Lookup button to display a selection list of the valid counties.
In Inventory
You are prompted to enter the inventory code for the inventory run or storage area in which this load will be stored. If you entered a default inventory code in the gate setup file, this field automatically defaults to the code assigned in the gate setup. If you did not enter a default inventory code in the gate setup file, you are prompted to enter an inventory code. Press the Enter key, or click the Lookup button to display a scroll list of the valid inventory codes.
Out Inventory
If the load is an inventory shipment, you are prompted to enter the inventory code for the inventory run or storage area in which this load was shipped. If you entered a default inventory code in the gate setup file, this field automatically defaults to the code assigned in the gate setup. If you did not enter a default inventory code in the gate setup file, you are prompted to enter an inventory code. Press the Enter key, or click the Lookup button to display a scroll list of the valid inventory codes.
Security
The Security field allows for the entry of up to fifteen characters.
Number of Logs
You are prompted to enter the number of logs on the load only if you have the field flagged as required in the destination’s product file.
Gross Weight
This field contains the gross weight of the load.
Tare Weight
This field contains the tare weight of the load.
Net Weight
This field displays the net weight of the load and is automatically calculated by the system when the tare weight is recorded by the system.
Gross Tons
This field displays the gross tons of the load and is automatically calculated by the system.
Cull Tons
This field displays the cull tons of the load and is automatically calculated by the system.
Net Tons
This field displays the net tons of the load and is automatically calculated by the system.
To save and exit the External Transactions window, press Page Down, click on the OK button, or press “Alt O”. To exit without saving the External Transactions window, click on the Cancel button, press “Alt C”, press Esc, or click on the “X” in the upper right corner of the screen.